

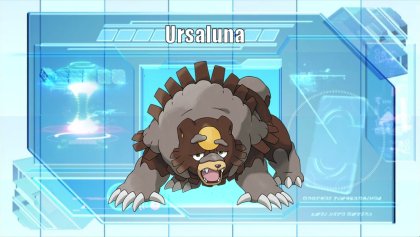
Ursaluna, the Peat Pokťmon. I believe it was Hisuiís swampy terrain that gave Ursaluna its burly physique and newfound capacity to manipulate peat at will.
Overview
Ursaring getting an evolution in Legends Arceus was a surprise, given while Ursaring has never been a standout competitively, it was still a rather powerful Pokťmon with its Guts boosted STAB Facades being one of the strongest attacks in the game. And then Ursaluna comes along and cranks almost everything good about Ursaring up to eleven. Base 140 Attack is insane, ensuring that Ursalunaís Guts boosted STAB Facades will maul anything that isnít resistant or immune. Even then, Ursalunaís new Ground subtyping answers those as well, devastating the Rock and Steel types that would tank FaÁade as well as any non-Levitating Ghost type. On top of that, Ursalunaís coverage is vast, giving it an answer for pretty much any situation it could desire. Guts further reduces counterplay, preventing Burns from shutting Ursaluna down as opposed to other physical sweepers. Base 130 HP and 105 Defense is incredible as well, giving Ursaluna more physical bulk than Skarmory when looking at stats alone, greatly facilitating Ursaluna pivoting in to start mauling.
Ursaluna still canít fully shake the issues of Ursaring however. It is slow, Base 50 speed all but requiring Ursaluna to tank an attack before firing back. Which is unfortunate, given Ground Normal is rather impotent defensively having four very common weaknesses for next to no resistances, further worsened by the general dominance of Ground types ensuring everyone is packing several answers to them. Base 80 Special Defense is another achilles heel, giving a great point to target to bring the bear down quickly. Guts is ironically as much as a curse as it is a blessing, with almost all Ursaluna holding Flame Orb, easily triggering Guts, but adding chip damage that in conjunction with Ursalunaís poor speed, exposure to entry hazards, common lack of recovery and next to no resistances leave Ursaluna rather quickly worn down. Despite its defensive shortcomings, Ursalunaís power cannot be denied, placing your opponent on a desperate clock to survive this bear attack.
Positives
Base 140 Attack boggles the mind, ensuring Ursaluna hits hard no matter what.
Boosting options in Guts and Swords Dance push Ursalunaís attack even higher while protecting it from status.
Normal Ground is fantastic offensively, the two typings hitting almost everything and Ursalunaís movepool is deep enough to answer the little that its STABs canít.
Base 130 HP and 105 Defense makes Ursaluna incredibly bulky, able to soak up neutral and resisted physical attacks with relative ease.
Negatives
Base 50 Speed requires Ursaluna to rely on its bulk to act, taking hits before dealing them itself.
Normal Ground is poor defensively, giving common Water, Grass, Ice and Fighting weaknesses
Base 80 Special Defense while not outright bad, is easily exploitable.
Movesets
Mud Bear
-Swords Dance
-FaÁade
-Headlong Rush
-Fire Punch
Ability: Guts
Item: Flame Orb
EVs and Nature:
252 HP / 252 Atk / 4 Def
Adamant Nature
Swords Dance Ursaluna is a game ending wallbreaker, able to break the defensive backbone of many teams leaving them easy pickings to Ursalunaís teammates. Use Ursalunaís first turn to go for the Swords Dance and have Flame Orb trigger, then go on the offensive. FaÁade is the move you will be selecting most of the time. Base 140 before STAB move boosted by Guts is absurd, pulling off feats like cleanly 2HKOing Max HP and Defense Dondozo, with other walls like Max HP and Defense Great Tusk, Gliscor, Ting-Lu and Landorus-T being cleanly OHKOíd due to Swords Dance (and are still 2HKOd regardless). Headlong Rush answers the Rock and Steel types that otherwise laugh at FaÁade, devastating Garganacl, Heatran and any potential Tera Steel target. Fire Punch rounds out the set, smashing Corviknight and Orthworm who do deal with both STABs rather well in addition to Air Balloon Gholdengo and Kingambit who are immune to both STABs.
Tera Types:
And if you thought that STAB Guts boosted FaÁade wasnít scary enough, having Ursaluna Terastalize into Normal will put the fear of bear into you, pulling off stunts like being able to 2HKO Orthworm and Corviknight after Stealth Rocks, let alone anything else that gets in Ursalunaís way. Tera Normal also addresses some of Ursalunaís defensive woes, removing its onerous Water, Ice and Grass weaknesses, though losing the immunity to Electric and resistance to Rock can be painful. Otherwise, you have your pick of defensive Terastalization options. Tera Fairy gives a valuable resistance to Fighting on top of an immunity to Dragon and most Steel and Poison types do not relish Ursalunaís Ground STAB. Ghost and Water are other excellent defensive typing with few weaknesses, Ghost giving an immunity to Fighting and hard to exploit weaknesses and Water giving valuable Water and Ice resistances.
EVs and Items:
Max HP and Attack are recommended. You want as much Attack as possible for Ursaluna to wallbreak and Ursalunaís poor speed makes HP investment natural since Ursaluna is dependent on its bulk. Speed investment is not without merit, with 140 Speed being enough to outrun Skeledirge and Corviknight, important for Ursaluna to get the KOs it needs to function. If running Ursaluna with Trick Room, dump speed and go for a Brave Nature to outslow as many targets as possible. Flame Orb is mandatory. It triggers Guts and gives Ursaluna effective immunity to other statuses while having the lightest chip damage.
Partners:
Ursaluna is the greatest argument for Trick Room being viable in a Singles setting, turning from a Wallbreaker into a lethal sweeper. As such, partners that can setup Trick Room are greatly valued. Hatterene is an excellent pick, able to easily pivot into Fighting attacks and keep hazards off with Magic Bounce while loving Ursalunaís ability to handle Steel types. Cresselia is another standout Trick Room setter and can enable Ursaluna to pull double duty, wall break in the early game then have Cresselia come in, setup Trick Room, Lunar Dance to pivot back out into Ursaluna and have it sweep while under Trick Room.
Since Ursaluna does need a turn for Flame Orb to activate, sometimes getting it in unscathed can be awkward. Slow pivots like Galarian Slowking pick up the slack here, able to get Ursaluna in safely and trigger Flame Orb right away. Galarian Slowking is a standout pick thanks to its Poison sub Typing wiping away the far more draining Toxic Spikes and setting up Future sight to help chip any potential Ursaluna checks and keep applying pressure in general.
Other Options:
Bulk Up -an alternative to Swords Dance that helps re-emphasize Ursalunaís physical bulk, though works best with Drain Punch.
Earthquake -weaker than Headlong Rush and further weakened by Rillaboomís Grassy Terrain but comes with its own distinct advantages. It doesnít drop Ursalunaís defenses and does not make contact, protecting Ursaluna from Rocky Helmet and Rough Skin, making it far bulkier than with Headlong Rush.
Drain Punch -offers invaluable recovery to help Ursaluna stick around but leaves you completely walled by Air Balloon Gholdengo.
Crunch -great for answering Ghost types, especially those with Levitate or Immune to Ground.
Trailblaze -turns Ursaluna into a double dance sweeper, able to catch both you and your friend while still popping Gholdengoís Air Balloon. However, even at max Speed Ursaluna is still outsped by the Base 100 crowd after 1 Trailblaze.
VGC & Doubles Options
Ursaluna has been touted for making Trick Room viable in Singles. In Doubles, where Trick Room is already viable, Ursaluna is a terror and potent win condition. Ursalunaís FaÁade KOs or at the very least compromises many opposing Pokťmon outright, and Ursaluna being able to spread damage around with Earthquake makes playing around it even more difficult. Ursaluna even has defensive utility, able to absorb Amoongusí Spore thanks to Flame Orb and Amoongus wants nothing to do with Ursaluna, being easily KOíd by FaÁade. However, Ursalunaís poor speed places it on a very strict timer to get the job done as its many weaknesses and chip from Burn prevent Ursaluna from excelling in the long game. Additionally, Ursalunaís coverage is markedly worse in Doubles since it needs Protect for turns when Trick Room isnít up, making it easier to play around it. Stiff competition with Iron Hands hurts as well, due to the former being far bulkier, offers better support with Fake Out and, speed ties and can OHKO with Close Combat. The influx of Ogerpon and Grassy Glide Rillaboom also means there are many more Pokťmon that can easily KO Ursaluna given the chance. While Ursaluna may not be the new face of Trick Room, it very much is a threat that must be respected.
Bear Tag Team
-Protect
-Facade
-Earthquake
-Swords Dance
Tera Type: Ghost
Ability: Guts
Item: Flame Orb
EVs and Nature:
252 HP / 252 Atk / 4 SDef
Brave Nature
Ursaluna unsurprisingly excels as a Trick Room attacker, using Protect to safely wait for Trick Room to be setup and Flame Orb to trigger, then proceed to rampage. STAB Guts FaÁade removes anything that isnít resistant with high Defense or immune, while Earthquake offers a lot of spread damage that helps ensure predicted Protects canít stall Ursaluna out as well as checking any Steel types thinking they can survive Ursaluna. Swords Dance rounds out the set, helping Ursaluna counter act Intimidate cycling and Reflect and punishing opponents who try to Protect stall in front of Ursaluna.
Tera Ghost is recommended to make Ursaluna immune to Fake Out so that canít be used to stall it out as well as remove many of its weaknesses to make Ursaluna harder to put down. Max HP and Attack for as much bulk and power as possible. Brave Nature to make sure Ursaluna outslows as many targets as possible in Trick Room.
Other Options and Preferred Partners:
Headlong Rush -great single target Ground attack that isnít blocked by Wide Guard, weakened by spread and Grassy Terrain or hits Ursalunaís partner, but due to the prevalence of another bear (Urshifu-Rapid), Rocky Helmet has become rather common.
Rock Slide -good spread move that doesnít hit Ursalunaís partner and has a healthy flinch chance while in Trick Room.
Cresselia -best Trick Room setter that enables Ursaluna to spam Earthquake with impunity. Cresselia naturally outspeeding Ursaluna allows it to safely heal Ursaluna with Lunar Blessing while in Trick Room without depriving Ursaluna of its Guts boost, helping address Ursalunaís bulk woes.
Farigarif and Indeedee -fellow Trick Room setters that provide additional protection against Priority moves, but arenít immune to Earthquake, making the attack far less spammable.
Iron Hands -as much a competitor as it is a partner, Ursaluna likes Iron Hands disruption with Fake Out for ensuring its own attacks go through as well as checking Dondozo.
Countering Ursaluna
Ursaluna is the gold standard of wallbreakers in terms of power. Once it gets a Swords Dance up, it can OHKO almost anything with right move and proper prediction, with no perfectly safe switch ins, only checks that must be able to outspeed and KO Ursaluna or be KOd in turn.
Checks do vary based on moveset. If Ursaluna is lacking Fire Punch, Orthworm and Corviknight can pivot in and threaten with Body Press, but Ursaluna still 2HKOs with Facade after Swords Dance or Tera Normal after chip damage, and often runs enough speed to outspeed both.
Sets only having Ground or Normal attacks are completely walled by floating Ghost types like Tera Ghost Cresselia and Air Balloon Gholdengo, but canít handle most coverage moves.
Dealing with Ursaluna without having a Pokťmon KOíd often requires a good degree of offense, ideally having a Ghost type pivot in FaÁade or Flying type pivot into a Ground STAB and then threaten or remove Ursaluna with their own attacks. Specs Dragapult, Specs Enamorus, Rotom Wash, and Pelipper can all perform this role, though Dragapult and Enamorus require some chip damage beforehand to get the KO.
Hazards are another way to help wear Ursaluna down faster, as it canít run Heavy Duty Boots to compensate. Toxic Spikes especially, while it does trigger Guts, it places Ursaluna on a far shorter timer than the Flame Orb, making stalling out Ursaluna more feasible.
If lucky, one can stop an Ursaluna break before it starts. If the Pokťmon Ursaluna comes in on has Knock Off, you can remove Flame Orb before it burns Ursaluna, leaving Guts offline and making it far more manageable, with the likes of Dondozo now able to reliably wall it.
Revenge killing Ursaluna after it picks up a KO is a relatively simple chore given its slow speed, many weaknesses, exposure to hazards, chip from Burn and the defense drops of Headlong Rush.
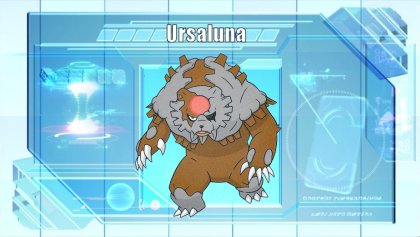
Bloodmoon Ursaluna, the Peat Pokťmon. It crossed the sea and drifted ashore in a new land. Surviving in this place led it to take on a unique appearance and gain special powers. This special Ursaluna can see in the dark with its left eye and protects itself with mud that is as hard as iron.
Overview
If Ursaluna was unexpected, then it getting an alternative form in the Teal Mask DLC is a bolt from blue bear den. Bloodmoon Ursaluna plays differently from its base Hisuain form, being a bulky special attacker with its own hybrid ability of Keen Eye + Scrappy preventing Ghost types from being an answer to its STABs. Bloodmoon still has the titanic physical bulk that normal Ursaluna is known for but lacks the direct explosive power due to not having Guts and Swords Dance. Not having Guts or Guts equivalent is a blessing in disguise, freeing up Bloodmoonís itemslot and not requiring it to take chip damage every turn. Couple this with access to Moonlight and Bloodmoon Ursaluna is effectively bulkier than its counterpart despite the lower defenses. Thanks to Mindís Eye, the normally great Normal Ground coverage is further bolstered, affording Bloodmoon run extra support moves without losing out on coverage. And while its coverage is not as deep as base Ursaluna, Bloodmoon has some rather choice options including Mindís Eye Vacuum Wave to address its poor speed.
Bloodmoon Ursaluna still has many of the same issues. Base 52 Speed is still incredibly slow and Vacuum Wave can only do so much to address that. Bloodmoonís far worse 65 Special Defense makes preying on the defensively poor Normal Ground type rather trivial. The dominance of other Ground types ensuring everyone is packing Ground answers even more so. Bloodmoon Ursaluna is a departure from the norm for the line, but its titanic bulk and immense power make it a threat to be feared all the same.
Positives
Incredible Base 135 Special Attack is on par with legendaries in terms of power and can be further bolstered by Calm Mind.
Normal Ground already has impressive coverage and Mindís Eye leaves scarce few Pokťmon that can switch in safely.
Base 113 HP and 120 Defense make Bloodmoon Ursaluna a veritable wall and with reliable recovery in Moonlight, can repeatedly tank physical attacks without much issue.
Vacuum Wave provides an incredible answer to its Speed.
Negatives
Poor Base 52 Speed means once again Ursaluna is reliant on its bulk to function and excel, taking hits before dealing them out.
Normal Ground is impotent defensively with few resistances/immunities in exchange for very common weaknesses.
Base 65 Special defense is poor, preventing Bloodmoon from taking Special Attacks without boosts.
Movesets
Bloodmoon Rises
-Calm Mind
-Blood Moon
-Earth Power
-Vacuum Wave
Ability: Mindís Eye
Item: Life Orb
EVs and Nature:
252 HP / 4 Def / 252 SAtk
Modest Nature
Bloodmoon Ursaluna is a vicious Calm Mind attacker, using Calm Mind to bolster its already immense Special Attack and patch up its poor Special Defense, becoming a wrecking ball to smash through the opposition with its near unresisted STABs. Bloodmoon is an incredible STAB, having the same 140 Base Power as a boosted FaÁade and thanks to Mindís Eye, Ghost types canít switch in safely. Rock and Steel types fare slightly better, but their normally lower Special Defense does not make this an attractive proposition. And they still donít like Earth Power as follow up, having great coverage and dealing immense damage to the few Pokťmon that do resist Blood Moon. Vacuum Wave rounds out the set, giving Fighting coverage for the likes of Gholdengo and more importantly, providing priority that enables Bloodmoon to threaten normally faster targets, with no directly safe switch in due to Mindís Eye.
Tera Types:
Tera Fighting is highly recommended for bolstering Vacuum Wave. With Vacuum Waveís low base power and Blood Moon incredibly reliant on it to address its speed issues, every bit of power you can pump into it is greatly appreciated. Otherwise, you have the usual suspects for defensive Terastalizations. Fairy, Water and Ghost are all excellent defensive types for Ursaluna, changing weaknesses into resistances and making Ursaluna that much harder to KO. Fairy also has offensive merit if running Moonblast, give STAB to another coverage move. Tera Poison is also worth considering preventing Toxic from placing Ursaluna on a timer.
EVs and Items:
Max HP and Special Attack are to balance bulk and offense, getting the most out of Calm Mind. Alternatively, if going for more defensive sets, one could invest entirely into HP and Defense, relying on Calm Mind to answer Special Attack and Special Defense making Bloodmoon nigh unbreakable once setup. Life Orb is recommended as the item for the most power and flexibility. Otherwise, item is up to preference. Leftovers gives passive recovery while setting up, while Silk Scarf or Soft Sand can be used to bolster offense without sacrificing Bloodmoonís Bulk.
Partners:
Ursaluna loves Trick Room, no matter the form. Trick Room setters like Hatterene and Cresselia are great enablersfor Ursaluna, the former keeping hazards off, the latter enabling two attempts at attacking with Bloodmoon using Lunar Dance, which also answer the poor 8 PP that Blood Moon has. The fact that both answer Fighting types and enjoy Bloodmoon thrashing Ghost types is just honey on the comb.
Dragonite makes for a great pivot with Ursaluna, resisting all but its Ice weakness and offering powerful priority while fitting with the same bulky teams that Bloodmoon excels on. In turn, Ursaluna is a great pivot into Rock type attacks and can use those as an entry point to get in safely.
As with many other setup sweepers, Bloodmoon appreciates partners that can enable it setting up safely. Spore Breloom, and Encore Ogerpon are great examples, able to trap an opponent into a useless move for Bloodmoon to come in safely and start setting up.
Other Options:
Moonlight -gives Ursaluna incredible longevity, enabling the ease of multiple Calm Mind boosts, or just a defensive set in general.
Assault Vest -immediate patchup to Bloodmoonís Special Defense at the cost of recovery and boosting power.
Moonblast synergizes well with Tera Fairy, being a spammable Tera STAB move that can be used every turn to hit Flying types, unlike Blood Moon.
Protect is fantastic for stalling out for Leftovers recovery and bypassing Blood Moonís ďrechargeĒ turn.
VGC & Doubles Options
As fantastic as Ursaluna is in Doubles, its Bloodmoon form may be even better. Yes, it lacks the sheer power that Hisuian Ursaluna reaches, but balances that out by being a Special Trick Room user that does not compete for a role with Iron Hands and having fantastic Spread damage in Hyper Voice. Thanks to Mindís Eye, Hyper Voice is an incredibly spammable spread move with little to no safe switch ins. However, poor speed again regulates Ursaluna to Trick Room teams only as out of it, its poor Special Defense and easily exploitable weaknesses make it far more manageable. The strict timer Trick Room has doesnít help either, making it far more feasible to outlast Bloodmoon Ursaluna. Even in Trick Room, Bloodmoon is outslowed by key threats like Iron Hands and opposing Ursaluna, which can strike it down before it can start.
Lunar Blood Howling
-Hyper Voice
-Earth Power
-Blood Moon
-Protect
Tera Type: Normal
Ability: Mindís Eye
Item: Throat Spray
EVs and Nature:
252 HP / 252 SAtk / 4 SDef
Quiet Nature
Bloodmoon Ursaluna is a potent Trick Room user, using Hyper Voice to not only quickly apply spread damage but also grab an immediate Special Attack boost akin to Guts, pushing Blood Moonís power into the stratosphere, with Flutter Mane, Sinistcha, and Tera Ghost users unable to endure the attack thanks to Mindís Eye. Heatran and Hisuian Arcanine who do resist Hyper Voice arenít safe either, as they are ruined by Earth Power and if the terastalize to avoid Earth Power, they are just opening themselves up to Hyper Voice. Blood Moon rounds out the set as a pseudo Hyper Beam, enabling Bloodmoon Urslauna to delete a must kill target when need be.
Tera Normal helps push Hyper Voice and Blood Moonís damage even higher. Trick Room set so you want to get as much bulk and damage as possible while dumping speed as low as you can.
Other Options and Preferred Partners:
Calm Mind -like normal Ursaluna, punish attempts to stall out Trick Room by setting up, increasing Ursalunaís damage and making it even harder to kill.
Vacuum Wave -pick off priority targets even out of Trick Room, especially Chien-Pao.
Cresselia, Indeedee-F and Farigiraf are all excellent for their own reasons as Trick Room setters. Cresselia provides extra longevity with Lunar Blessing. Indeedee-F and Farigiraf provide protection against priority.
Iron Hands -is an excellent Trick Room user that provides invaluable disruption with Fake Out and with its Attack can handle Assault Vest users that may give Bloodmoon trouble.
Countering Hisuian Ursaluna
Despite lacking world killing power of Ursaluna, Bloodmoon Ursaluna is even harder to switch into. Unlike normal Ursaluna that is constantly tearing itself apart, Bloodmoon has fantastic longevity requiring being answered. Mindís Eye further complicates matters. Normally one can attempt to position against Ursaluna by taking advantage of the immunities to Normal and Ground. Bloodmoonís Mindís Eye only has Rock and Steel types as ďsafeĒ switch ins, and even then, their poor Special Defense means that still take catastrophic damage.
Toxic and Toxic Spikes can help put Bloodmoon on a clock and make it harder for it to accrue Calm Minds or stick around with Moonlight, outside of Gliscor no user likes switching into any of Bloodmoonís moves and even Gliscor doesnít like eating a Blood Moon.
Bloodmoon Ursalunaís reliance on its namesake is an achilles heel. Tricking a Choice Item or encoring Blood Moon can force Bloodmoon to struggle, either forcing it out or making it easier pickings for your team. Speaking of Encore, Ogerpon is by far one of the best users of it, able to force Bloodmoon out if it Encoreís a Calm Mind or Moonlight and use that as an opportunity for Swords Dance.
Revenge KOing Bloodmoon Ursaluna is not as straight forward as its Hisuian counterpart, with Calm Mind able to bolster against Special Attacks and Vacuum Wave able to prey on frail faster attackers. Sneasler, Specs Pelipper, and other Rain and Sun users can all easily revenge KO Bloodmoon in the appropriate weather, with more able to do so if Bloonmoon is chipped.
Locations in Games
Red/Blue/Yellow:
Not in game
Gold/Silver/Crystal:
Not in game
Ruby/Sapphire/Emerald:
Not in game
FireRed/LeafGreen:
Not in game
Colosseum/XD:
Not in game
Diamond/Pearl/Platinum:
Not in game
HeartGold/SoulSilver:
Not in game
Black/White:
Not in game
Black 2/White 2:
Not in game
X/Y:
Not in game
Omega Ruby/Alpha Sapphire:
Not in game
Sun/Moon:
Not in game
Ultra Sun/Ultra Moon:
Not in game
Let's Go, Pikachu!/Let's Go, Eevee!:
Not in game
Sword/Shield:
Not in game
Brilliant Diamond/Shining Pearl:
Not in game
Legends: Arceus:
Crimson Mirelands: Massive Mass Outbreak
Scarlet/Violet:
Timeless Woods (Bloodmoon)
Anime Appearences
|
Ursaluna was yet to make an appearance in the anime
|
|