

Academy Events |
|
|
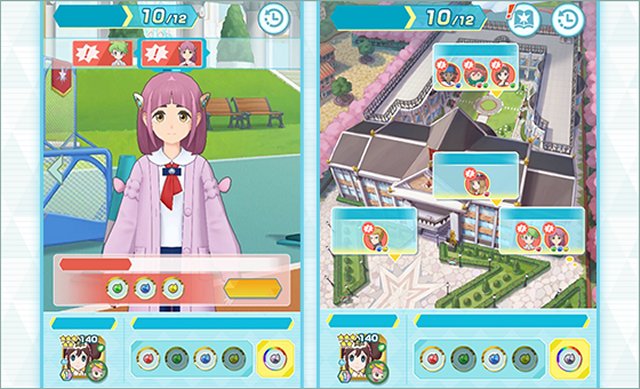
Academy Events are a new form of event introduced in March 2025 where you get given a new Sync Pair and have to power them up by completing stages and battles throughout the school up to the completion of the Final Exam and the Epilogue, from which your Sync Pair gets locked in These events have you start from scratch with each event and feature a pool of 100 stages to complete as standard between all events, as well as a variety of unique stages based around Sync Pairs tied in with the event With the Midterm and Final Battles, you can only battle them once. You can only go through a set amount of rounds in the event so you need to choose wisely. |
 |
Academy Sync Pair Upgrades |
|
|
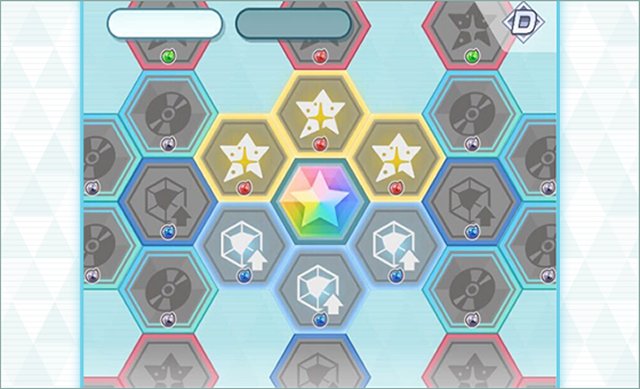
Academy Sync Pairs have got a special Sync Grid that require certain Sync Orbs to unlock. These are all obtained through battles and story completion in the event. When unlocked, you can unlock special TM Orbs which give your Sync Pair a special move and then unlocks a further part of the grid based around that move. You can only unlock 3 moves per Sync Pair. |
 |
List of Academy Events
| Image | Name | Duration |
 | Best Buddies Program April 2026 | April 18th 2026 - April 29th 2026 06:00 UTC |
 | Pasio Academy Opening April 2026 | April 18th 2026 - April 29th 2026 06:00 UTC |
 | Pasio Academy Fair - Prep | April 14th - April 29th 2026 06:00 UTC |
 | Art Agony, Teacher's Tears | January 19th 2026 - February 3rd 2026 06:00 UTC |
 | Learning and Relaxing | November 14th 2025 - December 2nd 2025 06:00 UTC |
 | Best Buddies Program | August 5th 2025 - August 23rd 2025 06:00 UTC |
 | Pasio Paranormal Studies Club | April 15th 2025 - May 3rd 2025 06:00 UTC |
 | Pasio Academy Opening | March 31st 2025 - April 18th 2025 06:00 UTC |
List of Base Academy Stages
Event Stages
Train with Giacomo |
||||||||
|
Style: Battle Rate: 10% Location: Entrance
|
||||||||
Train with Elaine |
||||||||
|
Style: Battle Rate: 10% Location: Courtyard
|
||||||||
Train with Rei |
||||||||
|
Style: Battle Rate: 10% Location: Large Lecture Hall
|
||||||||
Train with Silver |
||||||||
|
Style: Battle Rate: 10% Location: Rooftop
|
||||||||
Train with Serena |
||||||||
|
Style: Battle Rate: 10% Location: Cafeteria
|
||||||||
Train with Kris |
||||||||
|
Style: Battle Rate: 10% Location: Library
|
||||||||
Train with Nate |
||||||||
|
Style: Battle Rate: 10% Location: Schoolyard
|
||||||||
Train with Ortega |
||||||||
|
Style: Battle Rate: 10% Location: Entrance
|
||||||||
Train with Penny |
||||||||
|
Style: Battle Rate: 10% Location: Courtyard
|
||||||||
Train with Bede |
||||||||
|
Style: Battle Rate: 10% Location: Large Lecture Hall
|
||||||||
Train with Atticus |
||||||||
|
Style: Battle Rate: 10% Location: Rooftop
|
||||||||
Train with Arven |
||||||||
|
Style: Battle Rate: 10% Location: Cafeteria
|
||||||||
Train with Calem |
||||||||
|
Style: Battle Rate: 10% Location: Library
|
||||||||
Train with Eri |
||||||||
|
Style: Battle Rate: 10% Location: Schoolyard
|
||||||||
Korrina's Lesson |
|||||||||
|
Style: Battle Rate: 10% Location: Schoolyard
|
|||||||||
Cheren's Lesson |
|||||||||
|
Style: Battle Rate: 10% Location: Library
|
|||||||||
Nessa's Lesson |
|||||||||
|
Style: Battle Rate: 10% Location: Cafeteria
|
|||||||||
Skyla's Lesson |
|||||||||
|
Style: Battle Rate: 10% Location: Rooftop
|
|||||||||
Norman's Lesson |
|||||||||
|
Style: Battle Rate: 10% Location: Large Lecture Hall
|
|||||||||
Erika's Lesson |
|||||||||
|
Style: Battle Rate: 10% Location: Courtyard
|
|||||||||
Fantina's Lesson |
|||||||||
|
Style: Battle Rate: 10% Location: Entrance
|
|||||||||
Kabu's Lesson |
|||||||||
|
Style: Battle Rate: 10% Location: Schoolyard
|
|||||||||
Blaine's Lesson |
|||||||||
|
Style: Battle Rate: 10% Location: Library
|
|||||||||
Siebold's Lesson |
|||||||||
|
Style: Battle Rate: 10% Location: Cafeteria
|
|||||||||
Winona's Lesson |
|||||||||
|
Style: Battle Rate: 10% Location: Rooftop
|
|||||||||
Elesa's Lesson |
|||||||||
|
Style: Battle Rate: 10% Location: Large Lecture Hall
|
|||||||||
Milo's Lesson |
|||||||||
|
Style: Battle Rate: 10% Location: Courtyard
|
|||||||||
Volkner's Lesson |
|||||||||
|
Style: Battle Rate: 10% Location: Entrance
|
|||||||||
Chatelaine Campaign 1 |
||||||||||
|
Style: Battle Rate: 10% Round Requirements: Round 2 to Round 11 Location: Courtyard
|
||||||||||
Chatelaine Campaign 2 |
||||||||||
|
Style: Battle Rate: 150% Round Requirements: Complete this quest first: Chatelaine Campaign 1 (Hard) Location: Large Lecture Hall
|
||||||||||
Chatelaine Campaign 3 |
||||||||||
|
Style: Battle Rate: 150% Round Requirements: Complete this quest first: Chatelaine Campaign 2 (Very Hard) Location: Cafeteria
|
||||||||||
Chatelaine Campaign 4 |
||||||||||
|
Style: Battle Rate: 150% Round Requirements: Complete this quest first: Chatelaine Campaign 3 (Super Hard) Location: Schoolyard
|
||||||||||
Wally's Training 1 |
||||||||
|
Style: Battle Rate: 10% Round Requirements: Round 2 to Round 11 Location: Schoolyard
|
||||||||
Wally's Training 2 |
||||||||
|
Style: Battle Rate: 150% Round Requirements: Complete this quest first: Wally's Training 1 (Hard) Location: Schoolyard
|
||||||||
Wally's Training 3 |
||||||||
|
Style: Battle Rate: 150% Round Requirements: Complete this quest first: Wally's Training 2 (Very Hard) Location: Schoolyard
|
||||||||
Battle Nemona! 1 |
||||||||
|
Style: Battle Rate: 10% Round Requirements: Round 2 to Round 11 Location: Large Lecture Hall
|
||||||||
Battle Nemona! 2 |
||||||||
|
Style: Battle Rate: 150% Round Requirements: Complete this quest first: Battle Nemona! 1 (Hard) Location: Large Lecture Hall
|
||||||||
Battle Nemona! 3 |
||||||||
|
Style: Battle Rate: 150% Round Requirements: Complete this quest first: Battle Nemona! 2 (Very Hard) Location: Large Lecture Hall
|
||||||||
Team Rocket Infiltration! 1 |
||||||||
|
Style: Battle Rate: 10% Round Requirements: Round 2 to Round 11 Location: Rooftop
|
||||||||
Team Rocket Infiltration! 2 |
||||||||
|
Style: Battle Rate: 150% Round Requirements: Complete this quest first: Team Rocket Infiltration! 1 (Hard) Location: Rooftop
|
||||||||
Team Rocket Infiltration! 3 |
||||||||
|
Style: Battle Rate: 150% Round Requirements: Complete this quest first: Team Rocket Infiltration! 2 (Very Hard) Location: Rooftop
|
||||||||
Lost Leon 1 |
||||||||
|
Style: Battle Rate: 10% Location: Library
|
||||||||
Lost Leon 2 |
||||||||
|
Style: Battle Rate: 50% Round Requirements: Complete this quest first: Lost Leon 1 (Hard) Location: Courtyard
|
||||||||
Lost Leon 3 |
||||||||
|
Style: Battle Rate: 150% Round Requirements: Complete this quest first: Lost Leon 2 (Very Hard) Location: Large Lecture Hall
|
||||||||
Geeta's Special Lesson |
||||||||||
|
Style: Battle Rate: 5% Location: Large Lecture Hall
|
||||||||||
Alder's Special Lesson |
||||||||||
|
Style: Battle Rate: 5% Location: Rooftop
|
||||||||||
Cynthia's Special Lesson |
||||||||||
|
Style: Battle Rate: 5% Location: Cafeteria
|
||||||||||
Iris's Special Lesson |
||||||||||
|
Style: Battle Rate: 5% Location: Library
|
||||||||||
Three Friends from Kalos |
|||||||||
|
Style: Battle Rate: 10% Location: Large Lecture Hall
|
|||||||||
Pasio Special Concert! |
|||||||||
|
Style: Battle Rate: 10% Location: Rooftop
|
|||||||||
Triple Trouble! |
||||||||||
|
Style: Battle Rate: 10% Location: Cafeteria
|
||||||||||
Professor Sycamore's Elite Team |
|||||||||
|
Style: Battle Rate: 10% Location: Library
|
|||||||||
Ingo and Emmet's Two-Car Train |
||||||||||
|
Style: Battle Rate: 10% Location: Schoolyard
|
||||||||||
A Chance Encounter?! |
|||||||||
|
Style: Battle Rate: 10% Location: Outside School
|
|||||||||
Team Skull Boss and Bodyguard |
|||||||||
|
Style: Battle Rate: 10% Location: Outside School
|
|||||||||
Let's Go to the Mountains! |
|||||||||
|
Style: Battle Rate: 10% Location: Outside School
|
|||||||||
Let's Go to the Beach! |
|||||||||
|
Style: Battle Rate: 10% Location: Outside School
|
|||||||||
A Reward from Lear |
||||||||||
|
Style: Battle Rate: 10% Location: Outside School
|
||||||||||
The Original Trio |
||||||||
|
Style: Battle Rate: 5% Location: Entrance
|
||||||||
A Reward from Professor Kukui |
|||||||||
|
Style: Battle Rate: 5% Round Requirements: Round 1 to Round 5~? Location: Entrance Lock Outs: These quests will no longer appear: A Reward from Professor Kukui (Hard), A Reward from Professor Kukui (Hard), A Reward from Professor Kukui (Hard)
|
|||||||||
A Reward from Professor Kukui |
|||||||||
|
Style: Battle Rate: 5% Round Requirements: Round 1 to Round 5~? Location: Entrance Lock Outs: These quests will no longer appear: A Reward from Professor Kukui (Hard), A Reward from Professor Kukui (Hard), A Reward from Professor Kukui (Hard)
|
|||||||||
A Reward from Professor Kukui |
|||||||||
|
Style: Battle Rate: 5% Round Requirements: Round 1 to Round 5~? Location: Entrance Lock Outs: These quests will no longer appear: A Reward from Professor Kukui (Hard), A Reward from Professor Kukui (Hard), A Reward from Professor Kukui (Hard)
|
|||||||||
A Reward from Professor Kukui |
|||||||||
|
Style: Battle Rate: 5% Round Requirements: Round 1 to Round 5~? Location: Entrance Lock Outs: These quests will no longer appear: A Reward from Professor Kukui (Hard), A Reward from Professor Kukui (Hard), A Reward from Professor Kukui (Hard)
|
|||||||||
A Reward from Director Clavell |
|||||||||
|
Style: Battle Rate: 5% Round Requirements: Round 7 to Round 11~? Location: Courtyard Lock Outs: These quests will no longer appear: A Reward from Director Clavell (Hard), A Reward from Director Clavell (Hard), A Reward from Director Clavell (Hard)
|
|||||||||
Practice with an Ace Trainer 1 |
||||||||
|
Style: Battle Stamina Required: 20 Skip Tickets Usable?: No Rate: 10% Location: Entrance
|
||||||||
Practice with an Ace Trainer 2 |
||||||||
|
Style: Battle Stamina Required: 20 Skip Tickets Usable?: No Rate: 10% Location: Entrance
|
||||||||
Practice with a Youngster |
||||||||
|
Style: Battle Stamina Required: 20 Skip Tickets Usable?: No Rate: 10% Location: Courtyard
|
||||||||
Practice with a Rising Star |
||||||||
|
Style: Battle Stamina Required: 20 Skip Tickets Usable?: No Rate: 10% Location: Courtyard
|
||||||||
Practice with a Lass |
||||||||
|
Style: Battle Stamina Required: 20 Skip Tickets Usable?: No Rate: 10% Location: Large Lecture Hall
|
||||||||
Practice with a Punk Girl |
||||||||
|
Style: Battle Stamina Required: 20 Skip Tickets Usable?: No Rate: 10% Location: Rooftop
|
||||||||
Practice with a Beauty |
||||||||
|
Style: Battle Stamina Required: 20 Skip Tickets Usable?: No Rate: 10% Location: Cafeteria
|
||||||||
Practice with a Poké Kid |
||||||||
|
Style: Battle Stamina Required: 20 Skip Tickets Usable?: No Rate: 10% Location: Entrance
|
||||||||
Practice with a Hex Maniac |
||||||||
|
Style: Battle Stamina Required: 20 Skip Tickets Usable?: No Rate: 10% Location: Library
|
||||||||
Practice with a Pokémon Ranger |
||||||||
|
Style: Battle Stamina Required: 20 Skip Tickets Usable?: No Rate: 10% Location: Schoolyard
|
||||||||
Practice with a Sightseer |
||||||||
|
Style: Battle Stamina Required: 20 Skip Tickets Usable?: No Rate: 10% Location: Outside School
|
||||||||
Practice with a Camper |
||||||||
|
Style: Battle Stamina Required: 20 Skip Tickets Usable?: No Rate: 10% Location: Outside School
|
||||||||
Practice with a Black Belt |
||||||||
|
Style: Battle Stamina Required: 20 Skip Tickets Usable?: No Rate: 10% Location: Outside School
|
||||||||
Practice with a Swimmer |
||||||||||||||||
|
Style: Battle Stamina Required: 20 Skip Tickets Usable?: No Rate: 10% Location: Outside School
|
||||||||||||||||
A Present from Ball Guy |
|
|
Style: Story Rate: 3% Round Requirements: Round 7 to Round 11 Location: Courtyard |
|
Heads or Tails? |
|
|
Style: Story Rate: 5% Round Requirements: Round 3 to Round 11 Location: Courtyard |
|
Brock's Rock Smash Training |
|
|
Style: Story Rate: 5% Round Requirements: Round 3 to Round 11 Location: Courtyard |
|
Whosawhat's My Next Video? |
|
|
Style: Story Rate: 5% Round Requirements: Round 3 to Round 11 Location: Courtyard |
|
Lance's Training Ground |
|
|
Style: Story Rate: 5% Round Requirements: Round 3 to Round 11 Location: Courtyard |
|
What's Your Favorite Curry? |
|
|
Style: Story Rate: 5% Round Requirements: Round 3 to Round 11 Location: Courtyard |
|
N's Question |
|
|
Style: Story Rate: 3% Round Requirements: Round 7 to Round 11 Location: Courtyard |
|
Professor Sycamore's Question |
|
|
Style: Story Rate: 3% Round Requirements: Round 7 to Round 11 Location: Courtyard |
|
Professor Oak's Pokémon Lecture |
|
|
Style: Story Rate: 1% Round Requirements: Round 7 to Round 11 Location: Courtyard Lock Outs: These quests will no longer appear: Blue's Special Training! |
|
Blue's Special Training! |
|
|
Style: Story Rate: 1% Round Requirements: Round 7 to Round 11 Location: Courtyard Lock Outs: These quests will no longer appear: Professor Oak's Pokémon Lecture |
|
Break Time Interaction 1 |
|
|
Style: Story Rate: 5% Round Requirements: Round 3 to Round 11 Location: Courtyard |
|
Break Time Interaction 2 |
|
|
Style: Story Rate: 5% Round Requirements: Round 3 to Round 11 Location: Courtyard |
|
Break Time Interaction 3 |
|
|
Style: Story Rate: 5% Round Requirements: Round 3 to Round 11 Location: Courtyard |
|
Break Time Interaction 4 |
|
|
Style: Story Rate: 5% Round Requirements: Round 3 to Round 11 Location: Courtyard |
|
An Educational Talk |
|
|
Style: Story Rate: 5% Round Requirements: Round 3 to Round 7 Location: Large Lecture Hall |
|
Stretched Too Far... |
|
|
Style: Story Rate: 5% Round Requirements: Round 8 to Round 11 Location: Rooftop |
|
A Lady's Preference for Elegance |
|
|
Style: Story Rate: 5% Round Requirements: Round 8 to Round 11 Location: Cafeteria |
|
Crack Open a Book! |
|
|
Style: Story Rate: 5% Round Requirements: Round 3 to Round 7 Location: Library |
|
Pre-class Preparations...? |
|
|
Style: Story Rate: 5% Round Requirements: Round 8 to Round 11 Location: Schoolyard |
|